Vanity URLs
Before you start
- You need access to your domain management console to add DNS records, validate email requests, or both.
- You may need a network administrator to complete DNS changes.
Overview
When an Interact production site is set up, you get a permanent reserved URL in the format https://{{client_name}}.interactgo.com for each site, which you can use at any time to access your site. For any Interact site, you can set up one or more vanity URLs so that your users can access the Interact site with those URLs. A vanity URL could have a format like https://intranet.{{company_domain}}.com, where {{company_domain}} is your company's primary domain. Most customers set up a vanity URL for their production (live) site.
To set up a vanity URL, decide on a URL and provision (or purchase) it. You must have at least a subdomain, domain name and TLD.
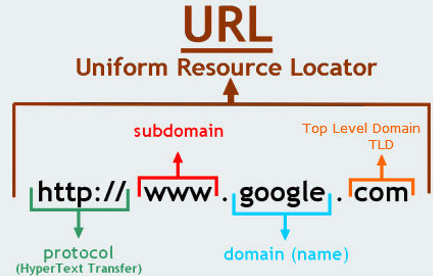
Interact can support wildcard subdomains, but you still need to designate at least one primary subdomain name. This primary site is registered as the primary vanity URL of the site.
Once you decide on your URLs, follow the steps below. If you plan to use multiple vanity URLs within the same domain, it is best to do this all at once, so you avoid registering multiple certificates and later renewing multiple certificates with different expiry dates.
For a vanity URL to work with Interact, a public certificate must be set up between your vanity URL (domain) and your Interact site. You can either have Interact do this for you, or provide an existing public certificate for the site. For details on using a certificate you create, see Importing an external certificate.
The rest of this page describes the process where Interact initiates the creation of the certificate.
Interact-initiated certificate creation process
The diagram below shows the vanity URL creation process.
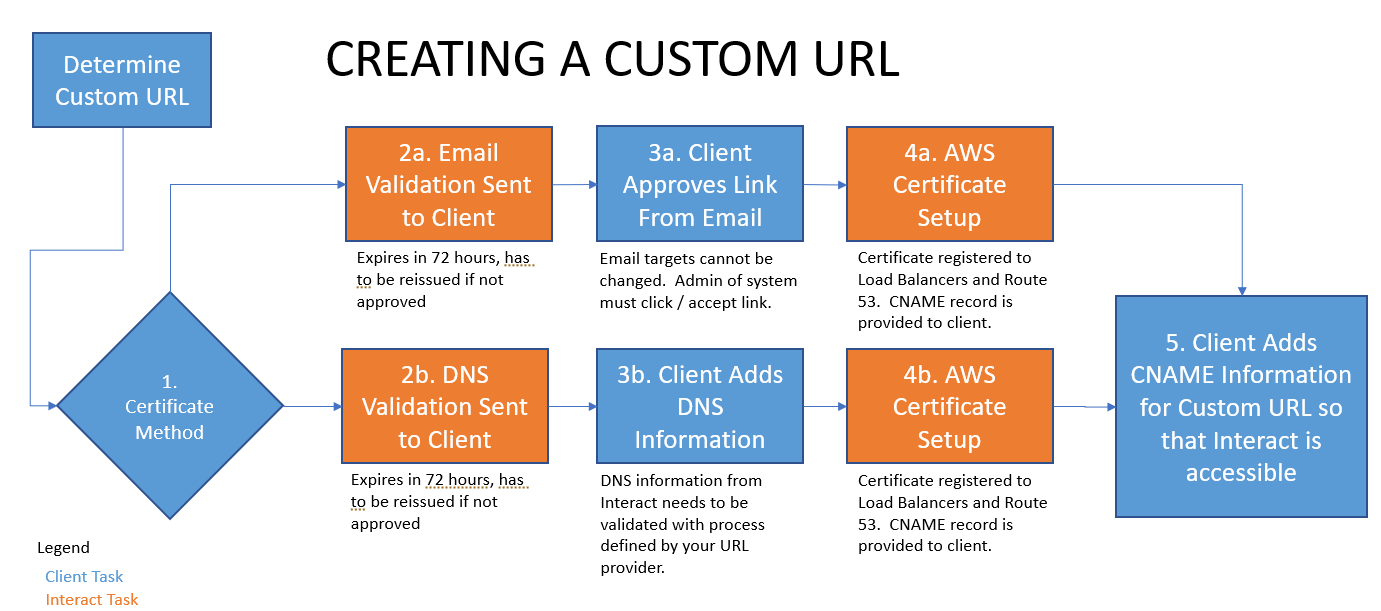
Step 1: Open a support ticket
Open an Interact Support ticket to begin the process. When you open the ticket, state the vanity URL you want to use and, if known, the method you will use to validate the certificate that Interact creates.
Step 2: Accept the authorisation request
Interact creates an authorisation request that you need to accept to proceed with the certificate setup. This happens via either email validation or DNS validation.
- Email validation:
- A system-generated email is sent to the registered email addresses on file for your domain. Click the link in the email to accept Interact's request to set up the certificate.
- Interact cannot customise the email addresses this is sent to. They must be changed in your domain management console.
- DNS validation:
- This is the preferred method, as it makes the certificate renewal process easier in future.
- Interact sends you DNS information to add to your domain. This record shows that you allow Interact to proceed with setting up a certificate.
Important: Authorisation requests last only 72 hours. You must click the email validation link, or add the DNS information to the domain, within 72 hours, or the process must be re-initiated.
Step 3: Complete validation
Depending on the validation type, either click the link in the email sent to your domain administrators for the vanity URL, or add the DNS information to your domain to allow Interact to proceed with certificate setup.
Note: If using DNS, the certificate validation must be available publicly. You cannot use an internal certificate approval process.
Once you complete this, notify Interact through the Technical Support ticketing system.
Step 4: Receive the CNAME record
Interact completes the certificate creation process and sends you the CNAME record for your site. This CNAME record is a permanent CNAME used to route traffic from the vanity URL to your Interact site.
Step 5: Add the CNAME record to your domain
Add the CNAME information from Interact to your domain, in a similar way to how the DNS information was added. This is provider-specific, so refer to your domain provider's documentation for details.
Once complete, run nslookup {{your_vanity_url}} and check that the Aliases area shows your vanity URL on the first row, the CNAME record on the second row, and a load balancer reference on the third row. These records generally indicate that the vanity URL is working. Next, test the URL by going to https://{{your_vanity_url}}/local-login to see if you get a login page.
You may also need to remove other Apex (A) records for this vanity URL with the DNS provider.
If applicable, go into Interact at Control Panel > SAML Authentication and set up SAML for the new URL. See Configuring SAML single sign-on for documentation.
Troubleshooting
- Many customers have an existing URL that they want to repurpose for use with Interact, but it is still being used for their old intranet site. Complete steps 1-4 above so that all you need to do at the end is the last step. Setting up a certificate for a vanity URL from scratch can take multiple days and requires admin-level support from both Interact and your company. By completing steps 1-4, you only need your network administrator to complete step 5 at go-live. At go-live, you also need to set up or test SSO with the production URL (if not already set up), because SSO is domain-specific (URL-specific).
- If you created content in Interact before switching to the vanity URL, you might have hard-coded (absolute) links pointing to your reserved URL. This is a problem because user sessions are set up against the vanity URL, and the link to the reserved URL forces the user to log in again. If this happens, republish the content with these links. If you have a large number of absolute links to the reserved URL, open a ticket with Technical Support, who can run a script to correct this.
- If you are going to have a vanity URL, it is best to wait to set up SSO until after the vanity URL is working. Otherwise, you have to set SSO up with the reserved URL and again with the vanity URL.
- If you have an existing certificate that uses email validation, you must renew the certificate yearly. To switch the renewal to DNS validation, the existing certificate cannot be renewed; a new certificate must be built.
- If you used email validation in the certificate process, you must validate an email request every year. This is why DNS validation is the preferred approach: the certificate auto-renews as long as the DNS record exists in the domain.
- If you are repurposing an existing vanity URL that is being used by another application, you may have conflicts with existing page history and cookies related to SSO or to how the application functions. This can cause Interact pages to continually auto-refresh or display incorrectly. If those issues go away in incognito or private mode in your browser, you might need to clear all history for that vanity URL in the browser.