Azure OAuth app and SharePoint
Warning: Azure ACS (Access Control Service) authentication is deprecated and will stop working on 2 April 2026. Use certificate-based authentication for all new integrations. Migrate existing client secret integrations as soon as possible.
Before you start
- You need access to the Azure portal as at least an Azure portal service account.
- You need someone with admin permissions to grant admin consent for the app's API permissions.
Overview
Setting up an Azure OAuth app requires the following:
- Creating the OAuth app
- Optionally restricting the OAuth app to access specific SharePoint sites only
- Granting permission for the OAuth app to use the SharePoint REST API
The native connector authenticates to SharePoint as the registered OAuth application/client.
You will need to provide values for:
- Client ID
- Tenant ID
- Tenant name
- Authentication method: Certificate (recommended) or Client Secret (deprecated)
- If Certificate:
- Certificate file upload
- Certificate password
- If Client Secret:
- Client secret ID
- Client secret value
Step 1: Create an Azure OAuth app
Before you configure the connector, create an OAuth app in the SharePoint platform.
- Sign in to https://portal.azure.com/ and select Microsoft Entra ID (formerly Azure AD).
- Select App Registrations, then New Registration.
- Give the app a name, for example
Interact Workplace Search. - Register the application.
- Make a note of the Application (client) ID and Directory (tenant) ID.
Step 2: Set up certificate-based authentication
To use certificate-based authentication, provide:
- A public certificate to upload to the Entra ID app registration
- A private certificate with password to supply when configuring the connector
You can use a certificate issued by your organisation's certificate authority or a trusted provider. The example below generates a self-signed certificate using PowerShell.
# Generate a self-signed certificate for SharePoint connector authentication
$certName = "SharePointConnector"
$certPassword = Read-Host -AsSecureString -Prompt "Enter a password for the certificate"

# Create certificate
$cert = New-SelfSignedCertificate `
    -Subject "CN=$certName" `
    -CertStoreLocation "Cert:\CurrentUser\My" `
    -KeyExportPolicy Exportable `
    -KeySpec Signature `
    -KeyLength 2048 `
    -KeyAlgorithm RSA `
    -HashAlgorithm SHA256 `
    -NotAfter (Get-Date).AddYears(2)

# Export certificate with private key (.pfx)
$pfxPath = "$PWD\SharePointConnector.pfx"
Export-PfxCertificate -Cert $cert -FilePath $pfxPath -Password $certPassword

# Export certificate without private key (.cer) for Entra ID
$cerPath = "$PWD\SharePointConnector.cer"
Export-Certificate -Cert $cert -FilePath $cerPath

Write-Host "Certificate created successfully!"
Write-Host "PFX file (private key, upload to Interact): $pfxPath"
Write-Host "CER file (public key, upload to Entra ID): $cerPath"
After generating the certificate:
- Navigate to Certificates & Secrets.
- Go to Certificates and upload the public key file.
- Keep the private key and password secure. You will need to provide them when configuring the SharePoint Workplace Search connector.
Important: Ensure the certificate remains valid and is rotated before expiry. The example script above generates a certificate with a two-year validity period.
Configure the Workplace Search connector
Enter the credentials into the SharePoint connector.
The TenantName for the SharePoint connector is the name of the tenant. For example, if your tenant is contoso.onmicrosoft.com, enter contoso:
{
  "AuthenticationType": "Certificate",
  "ApplicationClientId": "{{application_client_id}}",
  "DirectoryTenantId": "{{directory_tenant_id}}",
  "TenantName": "contoso",
  "CertificatePassword": "{{certificate_password}}"
}
You will also need to upload the private key certificate on the Workplace Search connector configuration page.
Step 3: Configure permissions
Next, set up the permissions for the OAuth app.
- Navigate to API Permissions and select Add Permission.
- Add the following application permissions:
- Graph API
Sites.Read.All— fetches the sites and their metadata. See Restrict the OAuth app to specific sites.Files.Read.All— fetches the sites and their metadata.Group.Read.All— fetches groups for document-level permissions.User.Read.All— fetches user information for document-level permissions.
- SharePoint
Sites.FullControl.All— see Restrict the OAuth app to specific sites.
- Graph API
The Sites.FullControl.All permission is required for SharePoint to read existing site permission assignments via the SharePoint REST API. This permission is needed only because SharePoint restricts access to permission metadata unless Full Control is granted. The connector performs read-only operations and does not add, remove, or alter users, groups, or roles on the site.
You can synchronise team sites (group sites) without any additional OAuth app permissions by listing them individually within the config as explicit sites to synchronise.
To configure the connector to automatically discover and synchronise all team sites (apart from an optional set of disallowed team sites), add the following permissions to the OAuth app:
- Graph API
Team.ReadBasic.AllTeamSettings.Read.AllTeamSettings.ReadWrite.All
Ask someone with admin permissions to grant admin consent, using the Grant Admin Consent link from the permissions screen.
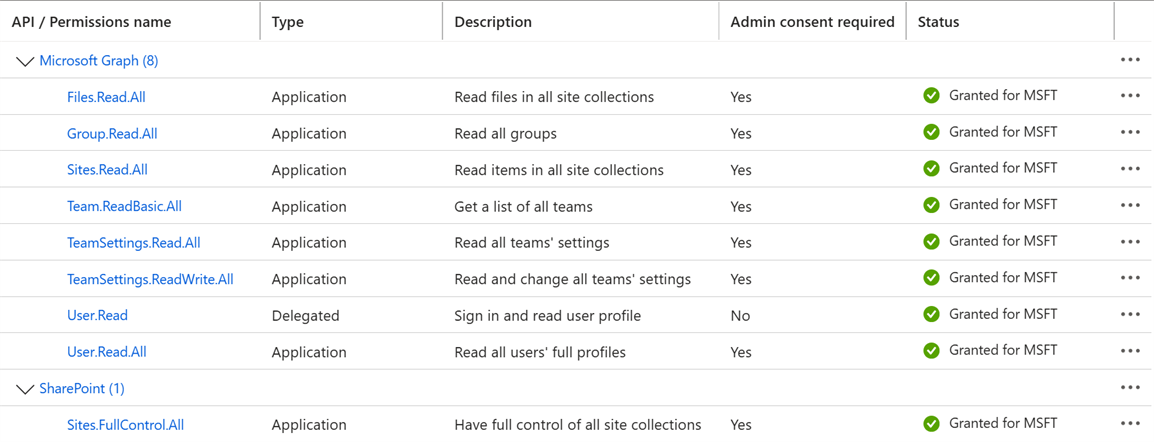
Save the tenant name (or domain name) displayed in Azure.
Restrict the OAuth app to specific sites
The Sites.Read.All permission scopes, set in the Microsoft Graph and SharePoint APIs, let the app registration access all sites within your tenant. It can be preferable to allow the app to access specific sites only.
Beyond the initial app creation process, you can take the following steps so that the OAuth app only has access to specific sites:
- Modify the Azure OAuth API permission scopes to include
Sites.Selectedinstead ofSites.Read.All. - Grant the Azure OAuth app access to the sites you want to synchronise.
- Update the SharePoint native connector to stop performing automatic site collection discovery (the default) and instead connect to a specified site collection only.
Modify the API permission scopes
Use the Sites.Selected scope instead of the Sites.Read.All scope for the Microsoft Graph API, and the Sites.FullControl.All scope for the SharePoint API.
Warning: If you modify an existing app registration to access selected sites only, fully remove the
Sites.Read.Allscopes from both the Microsoft Graph and SharePoint APIs, and remove any corresponding admin consent for those permissions. If you do not, the app registration can still access all sites.
Once set, the permissions should look like this:
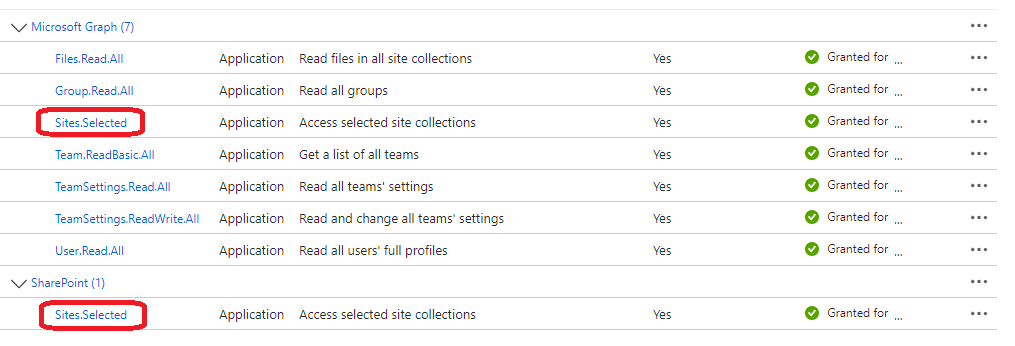
As a result of these changes, the connector can no longer discover site collections or sites. You must take additional steps before the connector can access the sites for synchronisation.
Grant OAuth app permissions to specific sites
The following Microsoft links describe in detail how to grant permission for an OAuth app to access a specific site collection using either the Graph API (Explorer) or PowerShell:
- Understanding Resource Specific Consent for Microsoft Graph and SharePoint Online
- Controlling app access on specific SharePoint site collections in Microsoft Graph
To find the ID of your site:
- Navigate to your site and append
/_api/site/idto the URL. You should end up with:https://{{tenant_name}}.sharepoint.com/sites/{{site_name}}/_api/site/id. - Take the
Edm.Guidfrom the response. - Navigate to
https://{{tenant_name}}.sharepoint.com/_api/v2.1/sites/{{edm_guid}}. - The JSON response contains the
IDproperty. That is the full ID of your site.
Note: When granting site permissions, assign the
FullControlrole to the target sites. It is the minimum permission level that allows an application to enumerate permission metadata using supported APIs.
Stop automatic site collection discovery
By default, the SharePoint native connector makes a Graph API request to fetch a list of site collections as part of its synchronisation process. This call returns Access Denied if you remove the Sites.Read.All permission scope and replace it with the Sites.Selected permission scope.
You must update the connector config JSON to change the site collection discovery mode to Specific rather than AutomaticDiscovery (the default value). Add the following JSON into the root of the configuration:
"SiteCollectionOptions": {
  "Mode": "Specific",
  "WebUrl": "{{site_collection_url}}"
}
Using Specific mode means the connector no longer performs automatic site collection discovery, and instead connects only to the site collection specified by the WebUrl parameter.
Set WebUrl to your SharePoint site collection URL, for example https://contoso.sharepoint.com.
Security considerations for Sites.Selected with Files.Read.All
When using Sites.Selected, the only Files permission that allows access to files is Files.Read.All. Other options such as Files.Read and Files.Read.Selected are not available as application permissions, so a background synchronisation service cannot use them.
With the Sites.Selected permission, you can only list the drives (drive IDs) and files (file IDs) within the sites allowed by the Sites.Selected permission. The Microsoft Graph API requires both a drive ID and a file ID to fetch metadata or file contents. With these permissions alone, you cannot discover drives or files beyond those specified by Sites.Selected. As a result, using Files.Read.All alongside Sites.Selected means the application registration can only access files within the sites allowed by Sites.Selected.
Legacy authentication (client secret, deprecated)
Warning: Client secret authentication is deprecated and should not be used for new SharePoint Workplace Search connectors. This section is provided for reference only, to support existing integrations and migration. Use certificate-based authentication for all new connectors.
In your Azure app registration:
- Navigate to Client credentials: Certificates & Secrets.
- Select New client secret.
- Pick a name for your client secret and select an expiration date. After this date, you will have to reconfigure your connector credentials by following these steps again.
- Note the client secret Secret ID.
- Note the client secret Secret Value. You must do this immediately, before leaving the page.
After creating the client secret, enter the Secret ID and Secret Value into the SharePoint connector credentials configuration.
SharePoint configuration
The Azure OAuth app does not automatically have access to the SharePoint REST API, so an additional step is required. Refer to Microsoft's documentation for setting SharePoint permissions.
- To set
DisableCustomAppAuthenticationtofalse, connect to SharePoint using PowerShell and runset-spotenant -DisableCustomAppAuthentication $false. - To assign full permissions to the tenant in SharePoint, go to the Manage App Permissions page in SharePoint. The URL follows this pattern:
https://{{tenant_name}}-admin.sharepoint.com/_layouts/15/appinv.aspx, where{{tenant_name}}is your SharePoint tenant name. For example, if your SharePoint URL ishttps://contoso.sharepoint.com, go tohttps://contoso-admin.sharepoint.com/_layouts/15/appinv.aspx. - This loads the SharePoint admin centre page, where you can create the app permissions request.
- In the App ID box, enter the application ID you recorded earlier, then select Lookup. The application name appears in the Title box.
- In the App Domain box, type
{{tenant_name}}.onmicrosoft.com, where{{tenant_name}}is your tenant name (for example,contoso.onmicrosoft.com). - In the App's Permission Request XML box, type the following XML:
<AppPermissionRequests AllowAppOnlyPolicy="true">
    <AppPermissionRequest Scope="http://sharepoint/content/tenant" Right="FullControl" />
    <AppPermissionRequest Scope="http://sharepoint/social/tenant" Right="Read" />
</AppPermissionRequests>
Warning: Apply the XML above exactly as specified, with line breaks, or the permissions may not apply correctly.
Troubleshooting
"Insufficient privileges to complete the operation."
Ensure the relevant API permissions (Graph, SharePoint) have been set.
"Attempted to perform an unauthorized operation"
If you see the following in your Workplace Search logs:
Error | Value of parsed object was null. Serialised value: "{"odata.error":{"code":"-2147024891, System.UnauthorizedAccessException","message":{"lang":"en-US","value":"Attempted to perform an unauthorized operation."}}}"
This normally means the SharePoint configuration has not been applied correctly. Ensure the SharePoint configuration steps above were followed correctly, and that the steps were performed on the SharePoint admin site (the -admin suffix).
"Microsoft.IdentityModel.Tokens.AudienceUriValidationFailedException"
If you see the following error in your Workplace Search logs:
Error | Failed to process serialised response. Serialised value: "{"error_description":"Exception of type 'Microsoft.IdentityModel.Tokens.AudienceUriValidationFailedException' was thrown."}"
This can result from not setting the TenantName parameter in the SharePoint connector credentials JSON correctly. For example, if your tenant is contoso.onmicrosoft.com, enter contoso:
{
  "ApplicationClientId": "{{application_client_id}}",
  "DirectoryTenantId": "{{directory_tenant_id}}",
  "SecretId": "{{secret_id}}",
  "SecretValue": "{{secret_value}}",
  "TenantName": "contoso"
}
It could also mean the SharePoint configuration has not been applied correctly. Ensure the SharePoint configuration steps above were followed correctly, and that the steps were performed on the SharePoint admin site (the -admin suffix).