

Migrate from Azure AD Graph API to Microsoft Graph API
Azure Active Directory API Changes
Microsoft has deprecated Azure AD Graph API, and it was initially planned for retirement on June 30, 2022, but this has now been extended to at least to December 31, 2022.
https://docs.microsoft.com/en-us/graph/migrate-azure-ad-graph-overview

Interact Profile Sources
Interact provides out-of-the-box profile synchronization functionality for Azure AD.
The sync features have historically relied on Azure AD Graph API (now deprecated and awaiting retirement.)
Interact has expanded the profile synchronization logic to support both, Azure AD Graph API (deprecated and awaiting retirement), and Microsoft Graph API (long-term Microsoft support.)
The Interact Profile Synchronisation has been heavily tested to ensure that it continues to behave consistently regardless of the API Mode selected - the profile sync will behave exactly the same after the API upgrade, making this a low-risk change.
Should any issues be experienced due to configuration or otherwise, you can easily toggle the API Mode back to the original setting in Interact Application Settings, and immediately revert the change.
Upgrade Your Azure AD Profile Source
Interact is fully prepared for the migration, and customers can begin their migration at any time, by following the below guide.
There are 2 main steps required to migrate your existing Azure AD Profile Source, to use the new Microsoft Graph API, with an additional test and clean-up step.
- Adding Microsoft Graph API permissions scopes via portal.azure.com
- Changing the API Mode dropdown in Interact from Azure AD Graph API, to Microsoft Graph API
- Test the sync by letting it run
- Remove old Azure AD Graph API permission scopes via portal.azure.com (cleanup)
Add New Microsoft Graph API Permissions
Azure AD contains App Registrations, which are used to communicate with another system (ie. Interact) and use the Azure APIs. Interact Profile Sources rely on an App Registration in Azure, and this is where the Secret Keys, and API Permissions are managed.
If you know which app registration is used for your intranet sync, you can skip the next few steps that explain how to identify the correct App Registration, and jump straight to step 5.
Step 1. Go to portal.azure.com, and navigate to your Application Registration used for the Profile Sync.
You should see something like this.
- Warning about Azure AD Graph API still being used.
- Azure Active Directory Graph permissions for (Directory.Read.All (Delegated), Directory.Read.All (Application), and User.Read (Delegated))

Step 2. Click on Add a permission

Step 3. Add Microsoft Graph permissions for Directory.Read.All (Delegated), and Directory.Read.All (Application).


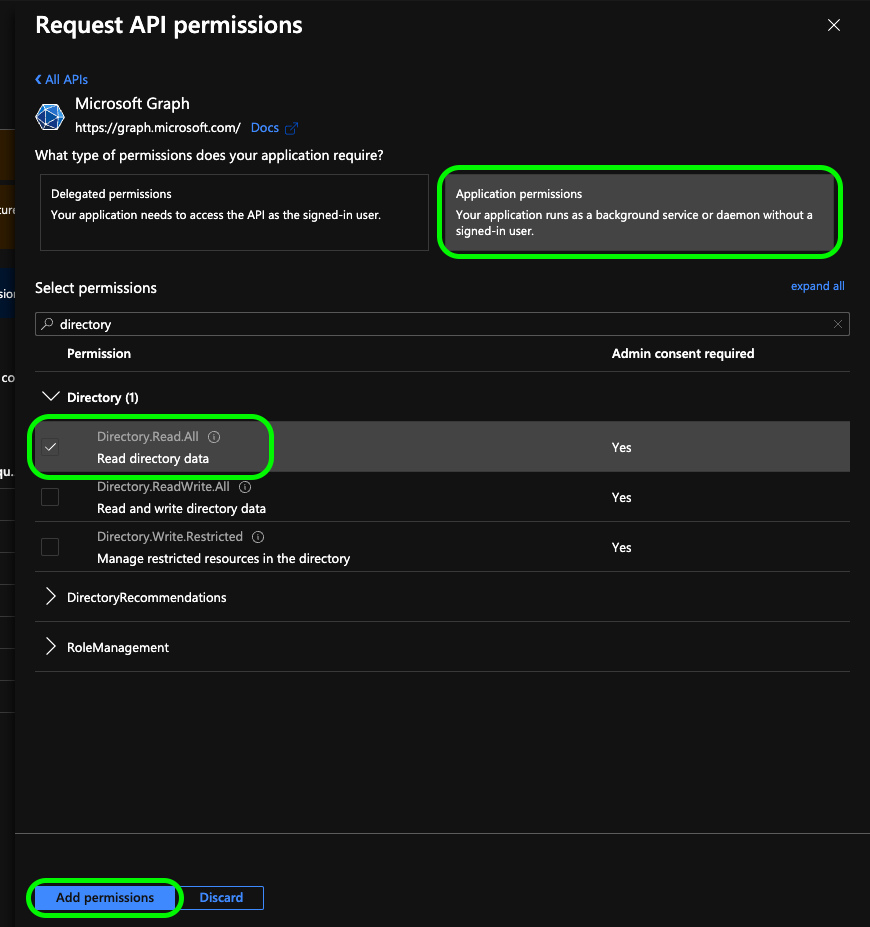
Step 4. You should now see the same permissions for Microsoft Graph API, as you do for Azure Active Directory Graph. Now click Grant admin consent for {mydomain}.


Step 5. You should now have all permissions granted and in place for the API Upgrade in your Interact Intranet.

Upgrade API Mode to Microsoft Graph API
Step 1. Log into your Intranet and got to Application Settings -> Manage People -> Manage Profile Sources (https://{my-intranet-domain}/InteractV7/UMI/List). Click on "Edit" next to your Azure profile sync.

Step 2. You'll see the below screen, with the API Mode dropdown - if Azure AD Graph API is selected, you need to upgrade by clicking on the dropdown, and selecting Microsoft Graph API.

After making the change to Microsoft Graph API, click Authenticate.

Step 3. The profile source configuration wizard will take you through all the other screens which are editable - no further changes are required for the API Mode upgrade, so feel through to Next through all the pages.
- On the Field Mapping page, click Next.
- On the Synchronisation Options page, click Next.
- On the Missing User Options page, click Next.
If you run into aPermission error here - your Azure permission scopes are not correct. - This page uses the selected API to get a list of Groups available in your Azure AD, so that you can select which groups you want to synchronize.
- On the Group Selection page, click Next.
- On the Frequency Selection page, click Next. <- You can use this page to modify the time to a few minutes into the future to test the sync process (eg. if it is 15:30 right now, I could set it to 15:35, and the sync would run in 5 mins allowing me to test it.) Make a copy the existing config before changing.
- On the Summary page, click Save.
Congratulations! You have now migrated to Microsoft Graph API!
Test the Profile Sync
Step 1. Open the profile source you'd like to test by clicking Edit.

Step 2. Follow the below steps:
- On the Configuration page, click Authenticate.
- On the Field Mapping page, click Next.
- On the Synchronisation Options page, click Next.
- On the Missing User Options page, click Next.
If you run into aPermission error here - your Azure permission scopes are not correct. - This page uses the selected API to get a list of Groups available in your Azure AD, so that you can select which groups you want to synchronize.
- On the Group Selection page, click Next.
You should now be on the Frequency Selection page.
Step 3. Before making any changes, note down the current configuration so you can return to it once you've finished the test. Now, modify the schedule to 5 mins into the future, from your current time. (eg. if it is 15:30 right now, I could set it to 15:35, and the sync would run in 5 mins allowing me to test it.)
Make sure the Frequency is set to Daily to ensure the sync triggers today.

Step 4. Click Next and on the Summary page, click Save.
Step 5. The sync should run on the scheduled time - it may take a few mins to an hour to process depending on the amount of data being synced.
Step 6. Once the sync has finished, check the sync Summary and the Sync logs to make sure it looks normal.
Step 7. Congratulations! If the sync has worked fine, you've successfully validated the Microsoft Graph API sync, and we can revert the sync schedule settings by following Steps 1 -> 4 and applying the original schedule settings.
Remove Old Permissions in Azure (Clean Up)
Do not do this step, until you have validated the Microsoft Graph API sync has worked successfully. Adding the Azure AD Graph API permission scopes is no longer permitted in Azure Portal.
Step 1. Go to the App Registration used by the Interact Profile Source, and open the API Permissions pane. Click the ellipsis on the heading row for Azure Active Directory Graph permissions.

Click on Remove all permissions*, and confirm Yes, remove* on the confirmation prompt.

Step 2. Now we need to revoke the removed permissions.
Click the ellipsis on the heading row for Azure Active Directory Graph permissions.

Click on Revoke all admin consents*, and confirm Yes, revoke* on the confirmation prompt.

You should now only see the Microsoft Graph API permissions.

You have successfully cleaned out the unnecessary permissions.
Reverting Back to Azure AD Graph API (Rollback)
Follow the same steps as Upgrade API Mode to Microsoft Graph API but instead of selecting Microsoft Graph API select the Azure AD Graph API on the first screen of the profile source configuration wizard.
You also need to ensure the Azure AD Graph API permission scopes are still present in the Azure App Registration in the Azure Portal.