General Information on Vanity URLs
General Information
When an Interact production site is setup, you will have a permanent "reserved" URL with the format https://{clientname}.interactgo.com for each site that can be used at any time to access your site. For any Interact site, you have the ability to setup one or more Vanity URLs such that your end users can access the Interact site with those URLs. It could have a format like https://intranet.{companydomain}.com where {companydomain} is your company's primary domain. Most customers setup a Vanity URL for their Production (i.e. Live) site.
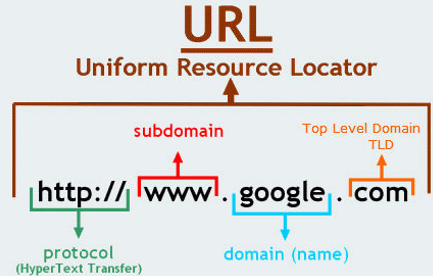
In order to setup a Vanity URL, you must determine a URL and provision (or purchase) the URL. You must have at least a subdomain, domain name and TLD. See diagram below.

Interact can support wildcard subdomains but you will still need to designate at least one primary subdomain name. This primary site will be registered as the primary Vanity URL of the site.
Once you determine your URL(s), you can proceed with the steps below. If you plan to leverage multiple Vanity URLs within the same domain, it is best to perform this all at once, as you avoiding having to register multiple certificates and, later on, renewing multiple certificates with different expiration dates.
In order to get a Vanity URL to work with Interact, a public certificate must be setup between your Vanity URL (domain) and your Interact site. You can either have Interact perform this activity... or you can provide an existing public certificate for the site. See here for details on leveraging a certificate that you create.
For the remainder of this page, we will discuss the process where Interact initiates the creation of the certification.
Interact-Initiated Certificate Creation Process
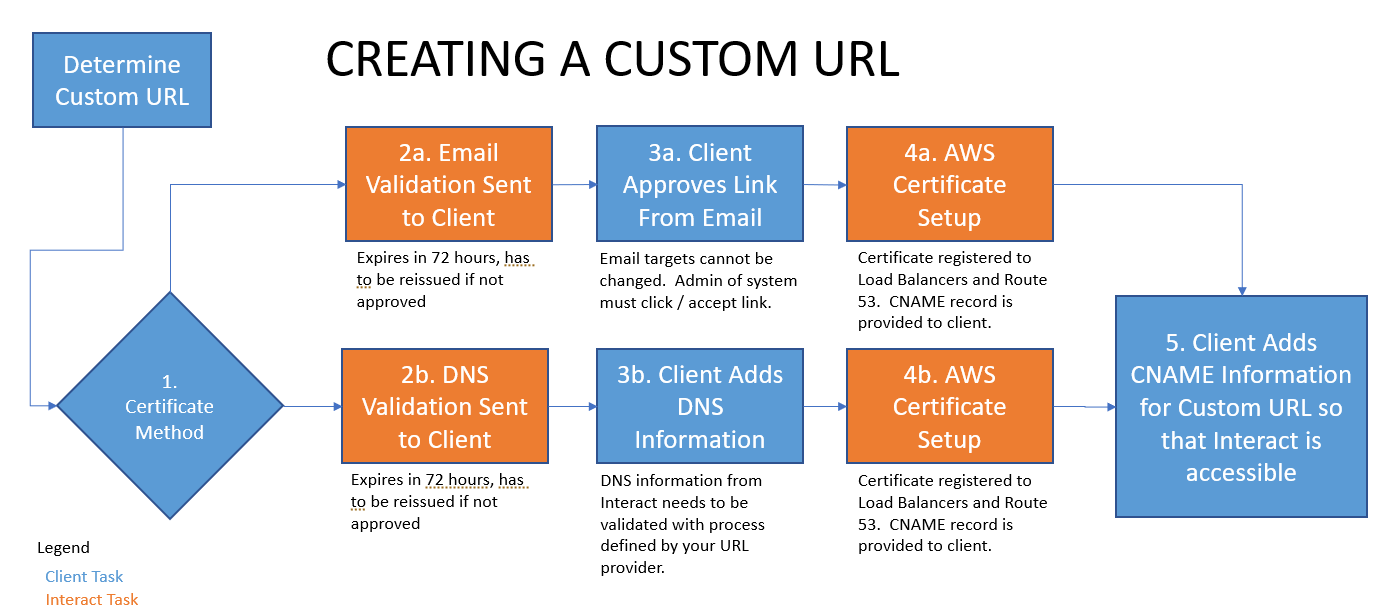
Here is a pictorial view of the Vanity URL creation process:

Step 1: You will need to open an Interact Support ticket in order to initiate the process. When you open the ticket, please clarify the Vanity URL you desire to use and, if known, the method that you will use to validate the certificate that Interact will create.
Step 2: Interact will create an authorization request that you will need to accept in order to proceed with the certificate setup. This will happen either via Email validation or DNS validation:
- Email validation approach:
- A system-generated email will be sent to registered email addresses on file with your domain. The link within the email must be clicked to show that you accept the request from Interact to setup this certificate.
- Interact cannot customize the email addresses that this goes to. It must be changed within your domain management console.
- DNS validation approach:
- This is the preferred method, as it will make the certificate renewal process easier in the future.
- Interact will send you DNS information that will need to be added to your domain. This code shows that you are allowing Interact to proceed with the setup of a certificate.
Note:
- Authorization requests last only 72 hours. Meaning, you must either click the link on the email validation or add the DNS information to the domain within 72 hours or the process must be re-initiated.
Step 3: Depending on which type of validation was used, you either need to click the link on the email that is sent to your Domain admins for the Vanity URL or add the DNS information to your domain allowing Interact to proceed with certificate setup. Please note that, if using DNS, the certificate validation must be available publicly meaning you cannot use an internal certificate approval process. Once you complete this, it is best to notify Interact via the Technical Support ticketing system that this is complete.
Step 4: Interact will complete the certificate creation process and send you the CNAME record for your site. This CNAME record will be a permanent CNAME that is used in order to route traffic from the Vanity URL to your Interact site.
Step 5: You will need to add the CNAME information from Interact to your domain in a similar process to how DNS information was added. This is provider-specific, so you will need to refer to documentation from your domain provider for these details. If you complete this step, you will be able to run the command nslookup {yourcustomurl} and see that the Aliases area shows your Vanity URL on the first row, the CNAME record on the second row and a load balancer reference in the third row. Having these records generally indicates that the Vanity URL is working. Next, you can test the URL by going to https://{yourcustomurl}/local-login and see if you get a login page.
You may also need to remove other Apex (A) records for this Vanity URL with the DNS provider.
Also, if applicable, you may need to go into Interact at Application Settings | Control Panel | Manage Security | Manage SAML and setup SAML for the new URL. See here for documentation.
Troubleshooting
-
Many of our customers have an existing URL that they want to repurpose for use with Interact; however, that URL is still being used for their old Intranet site. You should still complete Steps 1-4 above so that all you need to perform is the last step of the process. Setting up a certificate for a Vanity URL from scratch can take multiple days and requires admin-level support from both Interact and your company to complete. By completing Steps 1-4, you only need your network admin to complete Step 5 at the point of Go-Live. Also, at the point of Go-Live, you will also need to setup and/or test SSO with the Production URL (if not already setup), as SSO is domain-specific (i.e. URL-specific).
-
If you created content within Interact before switching to the Vanity URL, you might have hard-coded links (aka Absolute links) pointing to your reserved URL. This becomes a problem because user sessions will be setup against the Vanity URL and the link to the reserved URL will force the user to login again. If you run into this situation, you will need to republish the content with these links. If you have a large number of links with absolute links to the reserved URL, then you can open a ticket with Technical Support who can run a script to correct this.
-
If you are going to have a Vanity URL, it is best to wait to setup SSO until after the Vanity URL is working. Otherwise, you will have to set SSO up with the reserved URL and again with the Vanity URL.
-
If you have an existing certificate that uses email validation, you will have to renew the certificate yearly. If you wish to switch the renewal to DNS validation, the existing certificate cannot be renewed... a new certificate will have to be built.
-
If you leveraged email validation in the certificate process, you will have to validate an email request on a yearly basis. This is why DNS validation is the preferred approach, as the certificate will auto-renew as long as the DNS record exists in the domain.
-
If you are repurposing an existing Vanity URL that is being used by another application, you may have conflicts with existing page history and cookies related to SSO or how the application functions. We've seen this issue manifest itself in a situation where Interact pages continually auto-refresh or don't display properly. If those issues go away with Incognito / Private mode in your browser, you might need to clear all history for that Vanity URL in the browser.
Updated 9 months ago
